 |
| 4.9 | The switchboard | previous |
| 4.9.1 | Functions of the switchboard | to index page |
The first 5 subparagraphs of this paragraph deal with the electrical characteristics of the switchboard and only in the last paragraph is discussed how it can be built. This leads to the strange situation that in par. 4.9.3 and par. 4.9.4 everything is explained about calibrating the indicator and adjusting the voltage regulator while there is nothing yet to calibrate or adjust. Still it seems best to have the paragraph on building the switchboard at the end since it is easier to build it when one understands the way it works better. It only means that after building it, the reader will have to look back to the paragraphs on calibrating and adjusting it.
The electrical circuit of the switchboard of fig. 4.25 might discourage people who are not experienced with electricity. In a car, there is no special switchboard for the alternator. The voltage regulator is often built into it, there are no difficult adjustments, the fuse is integrated into a common fuse box or there is none at all and there is just the alternator control lamp instead of a complicated indicator. Such a simple circuit would be attractive for the firefly charger as well: Just two wires coming out of the charger to which the battery must be connected and that's all. Such a charger can be built and it would charge a battery. But compared to such a simple circuit, the switchboard circuit as given in fig. 4.25 performs the following extra functions:
See par. 4.9.2 for more details.
Then there is the 100 µF 63 V `Elco' capacitor. This part protects other electronic components against voltage spikes that are created when a battery is switched off while it is being charged, see box 4.15
|
|
| Fig. 4.25: Electrical circuit of the charger. |
Addition to internet version:
Electronic switchboard.There is also a design for a fully electronic switchboard, see http://www.microhydropower.net/mhp_group/portegijs/firefly_exp/Tech_issues.html#elect_switchb
It is more user-frendly and it can charge two batteries in one go. But it requires quite some electronics experience to build.
| 4.9.2 | Field current control |
In the electric circuit of a car, the `DF' connection of the voltage regulator is connected directly to the `F' connection on the alternator. On the switchboard, there is a set of 4 lamps connected in between `DF' and `F' (see fig. 4.25). This set of lamps acts as a resistor connected in series with the field coil inside the alternator. Consequently, the total resistance of lamps + field coil will be higher and the field current will be lower than it would be without these lamps.
Reducing the field current in this way has two effects:
The first lamp (the one to the left) is always `on' while the 3 others have switches. The lamps are connected parallel with respect to each other. So if more lamps are switched on, the total resistance of the set of lamps will be less and the field current will be higher. The last lamp is only 10 W so it is as if this lamp counts only for half (if 10 W lamps are hard to get, using four 20 W lamps will also do). This makes that with the 3 switches, already 6 different resistance values can be selected (with respectively 1, 1.5, 2, 2.5, 3 and 3.5 lamps switched on).
Trying to calculate what is the actual resistance of the set of lamps makes little sence because the resistance of each lamp varies strongly with the temperature of the filament inside, which in turn varies with the voltage over it.
The speed is not just determined by the field current as set by the number of lamps switched on:
After a battery has been connected and charging has been started, the operator should try out what is the best number of lamps to be switched on. This can be done in the following way:
The best number of lamps to be switched on, depends on the type of alternator fitted, the head and the size of the blocking timber (if any). So it will be the same as long as the same charger is used at the same site and trying out what is the best number has to be done only once.
If it was just for regulating the field current, a simpler circuit with normal resistors instead of lamps, would have been easier to build. But using lamps has some additional benefits:
| 4.9.3 | The indicator |
With the indicator on the switchboard, both voltage and current can be measured. The voltage that is measured is voltage Vi `at the indicator', see fig. 4.25. During battery charging, there are voltage drops over all cables that conduct this high charging current so then this voltage Vi differs slightly from voltage Vr at the regulator and voltage Vb over the battery poles. The current I that is being measured, is the net charging current to the battery. The gross current produced by the alternator is the net charging current plus the current consumed by the field inside the alternator.
The indicator circuit is designed such that it will measure voltages from 10 to 15 V, and currents from 0 to 20 A. Of course, the original scale of an indicator with 10 mA full scale current reads from 0 to 10 mA. For easy interpretation, the scale should be replaced or modified so that it reads directly from 10 to 15 V and from 0 to 20 A. The scale in fig. 4.26 has the right dimensions for a type of indicator that is commonly available in Holland and could be glued onto the original scale, if it fits. The small circle with cross outside the scale itself shows the right location for the shaft of the indicator needle. Normally, the plexiglass cover is clicked onto the indicator housing and it can be removed by carefully wriggling a knife in between. Take care not to damage the delicate needle and when putting the cover back, make sure that the pin of the zero adjustment screw falls in the slot of the indicator mechanism.
Measurements of voltages and currents are needed for the following purposes:
For serving these purposes well, the indicator should measure voltages quite accurately. A measuring error of only 0.1 V when measuring battery voltage before charging, would already mean that the state of charge of this battery is estimated 10 % too high or too low. Another thing about the voltage measurements is, that only the range between 10 V and 15 V is interesting. If a battery has a voltage below 10 V before charging, it is completely empty and there is no need to measure the voltage accurately in order to tell how empty it is. If the voltage during charging raises above 15 V, the voltage regulator is adjusted too high and again there is no need to know exactly how high this voltage is.
The way the voltage measurement circuit in fig. 4.25 works, is as follows:
The voltage measuring circuit in fig. 4.25 makes that the interesting range of 10 to 15 V covers (almost) the whole scale of the panel indicator. So compared to an ordinary indicator circuit that measures all voltages below a maximum voltage of 15 V, the interesting voltage range of 10 to 15 V is amplified 3 times on the indicator scale.
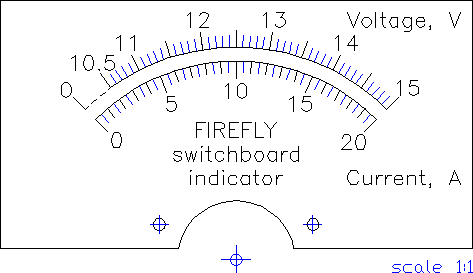 |
Fig. 4.26: A scale for the indicator. |
This also improves the accuracy of the indicator considerably. It is as if the first 10 V is measured by the two LM 336 devices, which produce a very stable reference voltage. So errors in the panel indicator only affect the measurement of the remaining voltage. This makes that with an ordinary `class 2.5' panel indicator (with a maximum error of ± 2.5 %), the complete voltage measuring circuit will have an error of less than ± 1 %, when adjusted correctly.
Above is described how it works in theory. In practice however, it behaves slightly different:
The voltage measuring circuit should be calibrated. This could be done in the field using test voltages of batteries. Or it could be done in the workshop, using a stabilised voltage supply (see annex E *building your own testing and calibrating equipment) to provide test voltages. Make sure that the indicator is held upright during calibration since this will be the position it will be used in in the field.
The current measurements do not have to be as accurate as the voltage measurements. Consequently the circuit can be simpler. There is just the current shunt, which produces a voltage drop proportional to the current that flows through it. This voltage drop in turn is measured directly by the panel indicator.
For choosing the correct resistance Rs for the current shunt, the voltage Vf at which the panel indicator displays `full scale' should be known. This is not given with the indicator data but it can be calculated from the resistance Ri of the panel indicator, which can be measured with a tester. The resistance of the copper wire inside increases with the temperature. So measure the resistance of the panel indicator at 20 ° or substract 0.43 % for each ° the temperature is above 20 °. Then the voltage Vf at which the indicator displays `full scale' can be calculated using Ohm's law (the 0.01 stands for the 10 mA full scale current of the panel indicator):
Vf = 0.01 * Ri
Now the resistance Rs of the current shunt can be chosen. At 20 A charging current, the panel indicator should indicate `full scale' (it is also possible to choose a lower or higher full scale current).
Vf = 20 * Rs so: Rs = Vf / 20
Now can be calculated what size and length of cable will give the desired resistance value for the current shunt.
Rs = 0.0175 * l / A
with:
0.0175 = specific resistance of copper at 20 °C, Ohm/m/mm²
l = length of cable in m
A = cross-sectional area in mm²
Cables are sold by their cross-sectional area and sometimes it is even printed on the cable itself. In case cables are sold by the American Wire Gage classification, the cross-sectional area is as follows:
| # 12 cable | 3.31 mm² |
| # 14 cable | 2.08 mm² |
| # 16 cable | 1.31 mm² |
| # 18 cable | 0.82 mm² |
Probably a cable of 1.5 mm² (or #16 in the American classification) will result in a convenient lenght for the current shunt. Better not choose a cable that is thinner than this because it might get too hot.
If indicators with 10 mA full scale current are not available, the voltage measuring circuit needs some modification (the right value for the current shunt can still be found as explained above). Suppose only a 1 mA full scale indicator is available. Now one could replace the 470 Ohm resistor and 100 Ohm trimmmer by a 4.7 kOhm resistor and 1 kOhm trimmer. Then, after calibration, the indicator will give the correct reading for 14.5 V. But the LM336 devices will only reach their minimum current at a voltage of some 12 to 13 V so measuring lower voltages accurately is impossible. To increase the current through these LM336 devices without influencing the current through the indicator itself, fit an extra 470 Ohm resistor between the point indicated by the arrow `Vi' and the `+' connection of the top LM336 device.
If this indicator circuit seems too difficult to make and calibrate, a tester could be used instead. Then it is adviseable to make connections for the tester on the switchboard:
| cross-sectional area of cable: | length between the wires: |
| 2.5 mm² | 1.43 m |
| 1.5 mm² | 0.86 m |
Fit a third wire to the end of the current shunt that
is nearest to the battery switch (on the other end, there
is the `Vi' wire already. Now the voltage drop over this
current shunt can be measured using the `mV' range on the
tester. Each mV represents 0.1 A, so 100 mV means that
the current is 10 A.
Of course one could also measure the current directly
using the current range on the tester, but this has some
disadvantages:
| 4.9.4 | Adjustment of the voltage regulator |
Normally, voltage regulators are adjusted to 14.2 to 14.4 V. This is safe from the point of protecting a battery against overcharging (for the effect of overcharging, see annex C *corrosion of grid in positive plates). At this voltage, a fully charged battery will draw such a low charging current that it does little harm. For a car, this is necessary because the battery will not be disconnected once it is fully charged.
For a firefly charger, such a low adjustment of the voltage regulator is undesirable:
Choosing a better value for the voltage regulator is a choice between evils. A low setting (say 14.2 V) means that charging takes long and there is a risc that batteries will wear out because they are not charged completely. A high setting (say 15.0 V) means that batteries will wear out because of overcharging if they are not disconnected once they are fully charged. This is especially likely to happen if the charger will be used at night. As a compromise, 14.7 V is chosen for the firefly charger.
Readjusting an adjustable electronic regulator is easy. You just have to find the trimmer that controls the voltage setting. If there is no cover that can be removed easily, look for holes where a small screwdriver fits through since the trimmer might be just behind there. However, most electronic regulators are not adjustable. Of those types, still the voltage setting can be influenced, see box 4.14.
| Box 4.14: Changing the setting of a non-adjustable regulator.
Electronic regulators without adjustment possibility can be `fooled' by creating a voltage drop in the wiring that supplies the voltage to them. Then the regulator will sense a somewhat lower voltage and provides field current until it senses a voltage that is above its set point (14.2 to 14.4 V) again. By then, actual output voltage will be this set voltage plus the voltage drop in the wiring to the regulator. The voltage drop has to be made in the wire that provides the positive voltage, so in the wire that connects `A' via the switchboard fuse to `D+', see fig. 4.25. A voltage drop of some 0.6 to 0.7 V could be created by inserting one diode in this wire. Of course must be connected in conducting direction (see par. 4.11.6) and it should be large enough to stand the field current (up to say 3 A). With such a high voltage drop, the regulator would become adjusted to some 14.8 to 15.1 V and this is becoming dangerously high for a battery: When it would not be disconnected in time, it could be seriously overcharged. To produce a lower voltage drop than this 0.6 to 0.7 of the diode alone, there could be a resistor in parallel with it. Some experimenting will be needed to find the right value for adjusting the regulator at 14.7 V because:
Probably a resistor of some 20 Ohm will be needed. The smallest size (1/4 W) will do. Have several values ready to try out: Choose a larger value if the voltage setting is still to low and a lower value if it ends up too high. This trick makes the voltage regulator less sensitive to small changes in the voltage. For charging batteries, this will not have negative effects. |
Mechanical regulators work with an electromagnet that pulls a switch towards disconnecting the field current, and blade spring that pulls the switch in the other direction. When the voltage is above the set point, the electro magnet is stronger than the spring and the field current is disconnected. The easiest way to change the set point to 14.7 V is by increasing the force exerted by the spring a little so that only at a higher voltage, the electromagnet can pull the switch towards disconnecting the field current. Most types are calibrated in-factory and have no adjustment screw. Find the place where the blade spring touches a support on the frame. By placing one or two layers of electrical tape between the spring and the support, the spring is bent a little further and thus the spring force will be a little higher. An alternative way to change the set point is by connecting a 5 Ohm trimmer in series with the electromagnet. Due to the extra resistance, the current through the electromagnet will decrease a little and with it, the force it exerts to the switch.
A mechanical regulator could very well have 2 electromagnets operating 2 switches and some 6 connections to the outside. Then there is a problem of finding out which electromagnet acts as the voltage regulator and how it should be connected. This problem is dealt with in par. 4.9.6.
Readjusting the voltage regulator can best be done in the field:
Ideally, the regulator should provide full field current as long as voltage Vr is below 14.7, and once Vr reaches 14.7 V, it should reduce the field current in such a way that Vr remains at 14.7 V sharp irrespectively of the charging current. In practice however, it might not limit the voltage to 14.7 V sharp (the regulator will react to little peaks in the voltage Vr which are bigger when the charging current is higher, while the tester measures only the mean voltage). Therefor it is best to readjust the voltage regulator while the charging current is around 4 A. This is the charging current at which the battery is considered fully charged and at this current, a correct setting of the regulator matters most.
With most voltage regulators, also the temperature has a slight effect on the voltage setting, with the set value becoming lower as the temperature increases. This is to protect the battery since at a high temperature, overcharging happens already at a lower voltage. So don't think that something is wrong if you have adjusted the regulator carefully and the next day the setting has changed, it might just be the temperature that has changed. To complicate things further, regulators heat up themselves because of the power dissipated internally. So they change their own setting as they get warmer until they reach an equilibrium temperature. Preferably, the charger should run for say 15 minutes before the regulator is readjusted, and ambient temperature should be close to the mean daytime temperature in that area.